How to correctly remove a wheel from a gyroscooter
If when using a gyroscooter or mini-sigway you have a breakdown, then you need to fix it urgently. Most often the owners of such devices are faced with repair motor-wheel or replacing the tube. In this article, we will describe in detail how to remove the wheel from the gyroscooter at home. Because the most frequent failure of mini-sigway is associated with this part.
Note, before the repair read the article completely, and if the described ways will suit you - only then proceed directly to the repair. In case of serious breakage it is recommended to apply to a specialized store (where you bought a gyroscooter) or a service center, where they will consult you on any question.
Why remove the wheel
When using a gyro scooter for a long time, it is difficult to avoid breakages. Sometimes even the highest quality device can fail, despite the fact that manufacturers are constantly improving the strength and resistance of the device to mechanical damage and environmental conditions.
Children's gyroscooters - 6-8 inches
Vehicles with small-diameter wheels (6-8 inches) are usually equipped with stiff tires. They are sensitive to the quality of the road surface. On a bad road, a gyro scooter can be damaged by strong vibration (received while riding), fragments of small stones and other things. This is fraught with failure of electronic components, as well as possible damage to the body. With vibration, the mounts become weaker and the wires become frayed. It is better not to use such a vehicle outdoors.
Adult Gyroscooters - 10-10.5 inches
The 10-inch wheels are more versatile. They are designed with soft tires that reduce the effects of shaking while riding. There are two types of large wheels: with a tube in the tire and tubeless. Each type has advantages, but the disadvantage is the same. It is not uncommon for owners of a mini-sigway to notice that the wheel is deflated. There may be several reasons for the camera malfunction:
- Piercing with a sharp objectYou may have to use a sharp rock or a shard of glass. For example, a sharp rock or a piece of glass.
- Formation of invisible microcrackswhich are difficult to detect even when the camera is lowered into the water. This situation occurs with long and active use of transport at low temperatures.
- Nipple is defective or not tightened enough. If it breaks, it will have to be replaced, and buying a special air leakage cap can also help.
Tubeless wheels can also puncture. If the rim is deformed, the tire contacts it unevenly, gradually the air pressure decreases, causing the wheel of the gyroscooter to go flat. In addition, the sealing of the gasket can be broken. In most cases, repair or replacement is required, for which you need to remove the wheel.
Step-by-step instructions for removing the wheel from the gyroscope
It is not difficult to repair the gyroscooter at home. First of all, you need to remove the wheel and check it for punctures or other malfunctions. Then determine whether the part can be repaired or you will have to buy a new one.
What you need for disassembly
Before dismantling, prepare the tools that will be needed:
- Phillips screwdriver or screwdriver;
- hex wrench;
- bicycle mounts.
Stage 1: Disassembling the enclosure
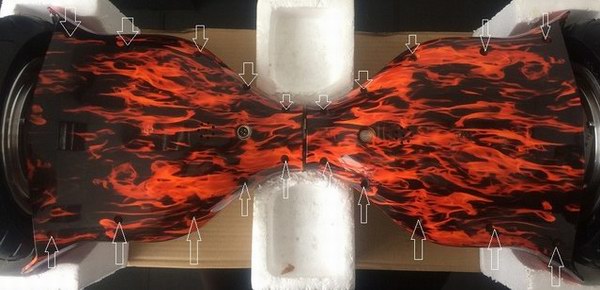
Use a Phillips screwdriver or a screwdriver to gently loosen the screws located on the bottom of the housing. Then lift it up and remove it. Note that on the 10-10.5" models, part of the case is secured by a wire from the power button.
Step 2: Disconnect from electronics
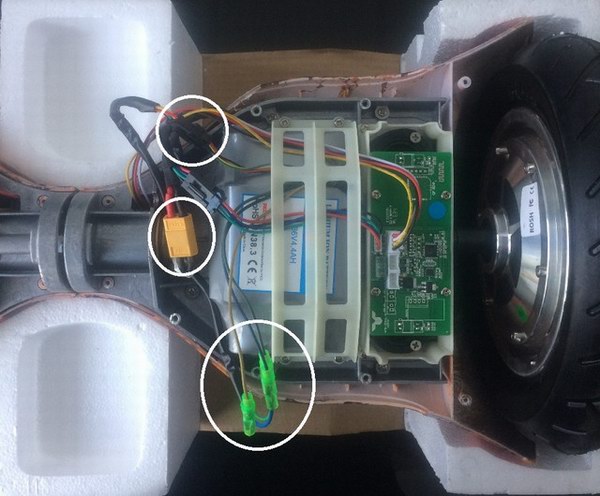
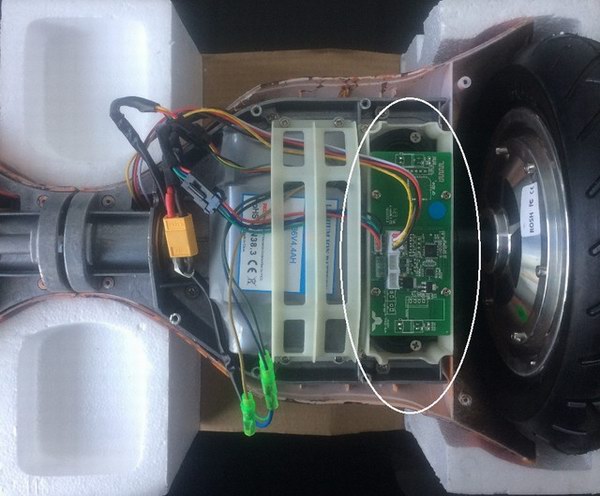
Disconnect the motor-wheel from the motherboard and the battery. The battery is fixed with a plastic holder, 4 screws of which we unscrew with a Phillips screwdriver. Then remove the stand for the side boards.
Step 3: Dismantling
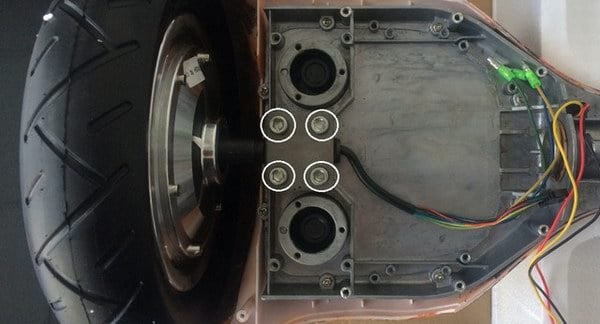
Now we see the mount that fixes the wheel. Using an Allen wrench, unscrew the 4 bolts, and disconnect the gyro part.
Reinstall the wheel and reassemble the vehicle in reverse order.
In the video you can see a complete disassembly of the wheel of Ninebot Mini Pro gyro scooter:
How to change a wheel on a gyroscooter
It is possible to replace the motor-wheel yourself, but the process is quite time-consuming. Do not forget that after opening the housing or replacing the part the warranty service will not be valid. Sometimes taping the camera is not enough, so you need to go to the store to buy a spare part. In order not to make a mistake with the choice, consult a special forum or talk to the seller, otherwise bought a wheel may not fit.
How to replace the camera on a gyroscooter
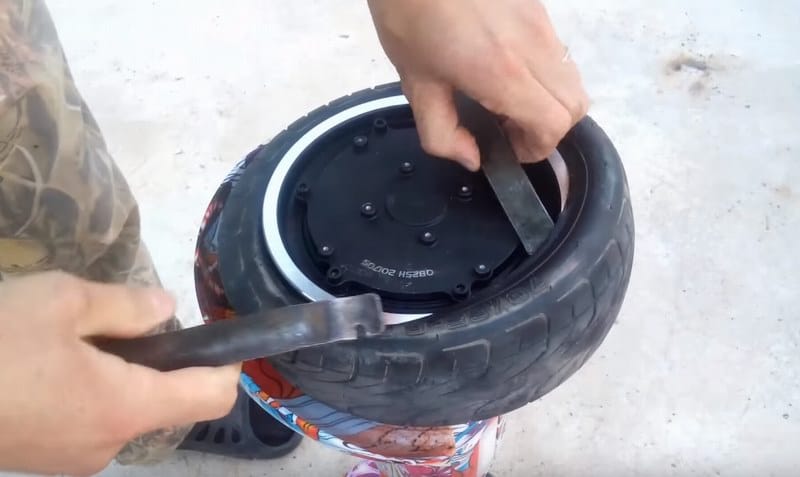
Anyone who has ever done this on a bike can change a tube. If you're sure it's the problem, you can put a new one in without removing the motor wheel. To do this, you will need bicycle wheel assemblers.
- To begin, let the air out completely by pushing on the nipple of the camera.
- To avoid damaging anything, carefully and effortlessly insert the assembler between the rim and tire.
- Next, begin the process of disassembling the tire, and it is better to do it nipples.
- If necessary, we remove the tire by hand. But if we only need the tube, it can easily be taken out by itself.
Once removed, inspect the camera for punctures or other deformations. The best repair option is to replace the camera with a new one. Now they are sold in any store of electric vehicles in assortment, so it is not difficult to buy a part. All you need to know is the diameter and width of your Segway wheel.
If you can't determine that, you can look at the specifications in the manual/on the box, or read the description on the manufacturer's website.
Tape the camera
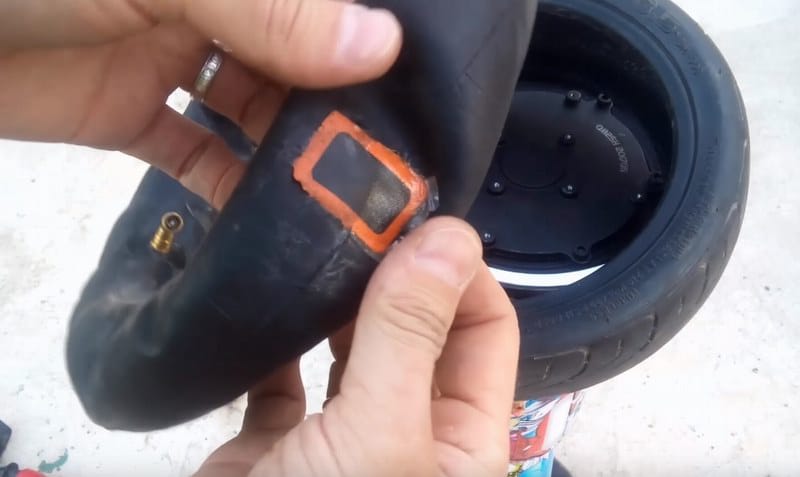
If the hole is not too big, it can be taped the same way as for bicycle wheels. Modern stores offer special patching kits. Their advantage is that you can use the kit in any circumstances and conditions. Even right on the street. The main thing is not to forget to take with you a compact repair kit and special pullers for mounting.
At home, you can glue the camera of the gyroscooter as follows:
- Prepare the necessary tools: glue, patch and vise.
- Clean the surface of the camera from grease and dirt in the place where the puncture was found. Use alcohol or acetone for this purpose. In the field a clean rag will do.
- Apply the glue to one or both surfaces, depending on the requirements of the instructions on it.
- Press firmly on the patch and hold for 10-15 minutes, during this time the adhesive should set.
You can use classic Moment glue, but it will take more time to fix it. In this case use a vice or some kind of press and leave the camera for 24 hours. If you do not have at hand a special patch, use a piece of rubber from another camera. Just pay attention to the fact that it must be well cleaned and without damage.
This video details the dismantling and gluing of the mini-sigway camera:
How to Inflate a Gyro Wheel Back
After installing the tube and tire on the rim of the electric vehicle, you need to inflate the wheel to the pressure that is indicated on the tire. But first, let's inflate the tube a little bit to make it straighten out. Using a bicycle or car pump with a pressure gauge, reach the pressure, which usually does not exceed 2.5-3 atmospheres, otherwise the wheel can burst.
Without a gauge, you have to pump by eye. The harder the wheels are inflated, the harder the ride will be.
If the weight of the user of electric transport is small (from 30 to 50 kg), in order to have a soft ride, the air should be slightly deflated.
Answers to popular questions
1. Under what conditions is it best to use a gyroscope to avoid damage?
It is better not to take the risk of driving an electric vehicle in the rain or snow. Even though the housing is waterproof, moisture can still get inside if the sealing of the device is damaged by a strong shock or jolt. In this case, there is no danger of damaging the electronics.
2. What kind of road can a gyro scooter ride on?
The electric vehicle is capable of driving on unpaved roads and sidewalk. It is not recommended to use it for driving on gravel or gravel. Small pebbles will damage the housing. Sand can also get inside the case and damage the motherboard of the device. Thanks to the maximum angle of inclination of 30-35 degrees, mini-sigway is able to move even on a small mountain.
3. Do these devices have brakes?
Unfortunately, there are no brakes. But the gyroscooter stops instantly when you tilt it backwards.
Now you know that the process of removing a wheel on a gyroscope is not very complicated. The most important thing when disassembling is not to damage the wires and electronics. You have to reassemble the device strictly in the same order as we described the disassembly process, but in reverse.

